Post-Installation Checklist
After installing, Belden Horizon Data Manager should be further configured. The following post-installation topics are included in this section:
- Keycloak Post-Installation Checklist
- Admin Console Post-Installation Checklist
Keycloak Post-Installation Checklist
This checklist provides steps that should be performed to verify that the Belden Horizon Data Manager is configured as desired and works correctly.
You must verify the following using Keycloak:
- Keycloak Realm Settings
- Keycloak Clients
- Keycloak Client Scope
- Roles
- Authentication
- Default Users
Before You Begin
Before completing the steps below, make sure you do the following:
- Install and configure the Belden Horizon Data Manager application on the same network as your devices. See Virtual Machine Installation (ESXi), Virtual Machine Installation (ESXi-Hypervisor), or Virtual Machine Installation (VMWare Workstation Player) for more information.
- Log in to Belden Horizon Data Manager the first time after installation.
Keycloak Realm Settings
To verify the Keycloak Realm Settings:
1. From a browser, enter: https://<IP address>/auth/admin. The log in for Keycloak appears.
2. Enter the following:
- Username: kadmin
- Password: kadmin
- Click Log In.
The Keycloak application opens to the Realm Settings.
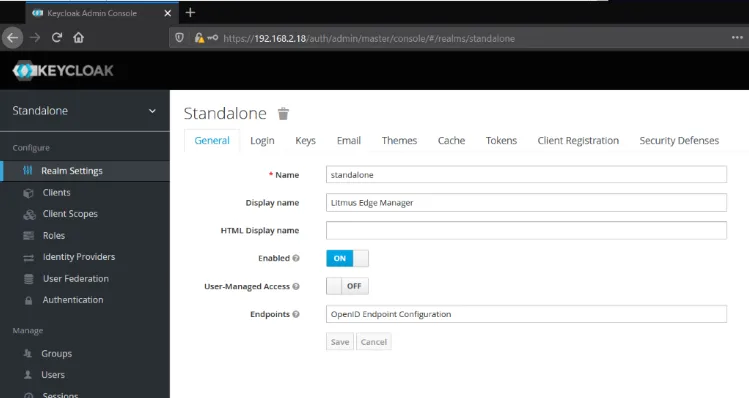
3. Make sure that the General pane displays Standalone, the Display Name field displays Belden Horizon Data Manager, and the Enabled toggle is On.
4. Click the Keys tab.
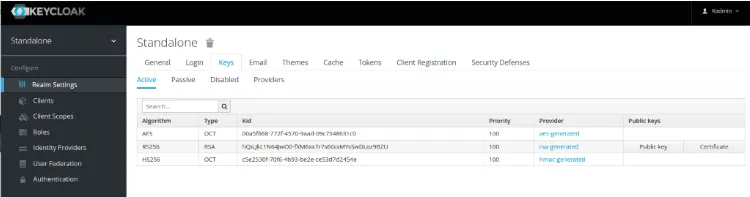
5. Make sure that three keys are created for the algorithms AES, RS256 and HS256.
Keycloak Clients
To verify the Keycloak Clients:
1. From the Navigation pane, click Clients. The Clients pane appears.
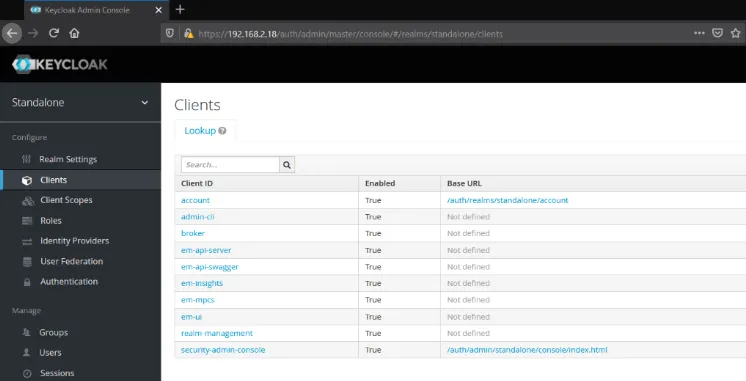
2. Verify that the following clients exist and are enabled:
- account
- admin-cli
- broker
- em-api-server
- em-api-swagger
- em-mpcs
- em-ui
- realm-management
- security-admin-console
Keycloak Clients Scopes
To verify the Client Scopes:
1. From the Navigation panel, click Client Scopes. The Client Scopes pane appears.
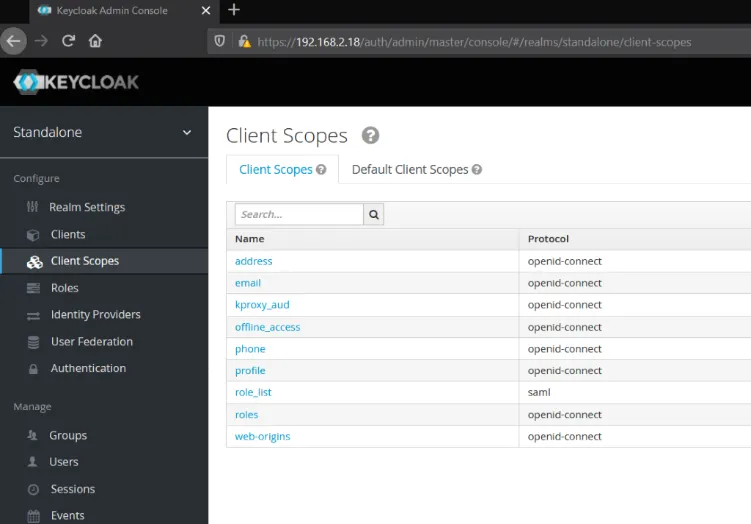
2. Verify that these Client Scopes exist:
- address
- email
- kproxy_aud
- offline_access
- phone
- profile
- role_list
- roles
- web-origins
Roles
To verify Roles:
1 From the Navigation pane, click Roles. The Roles pane appears.
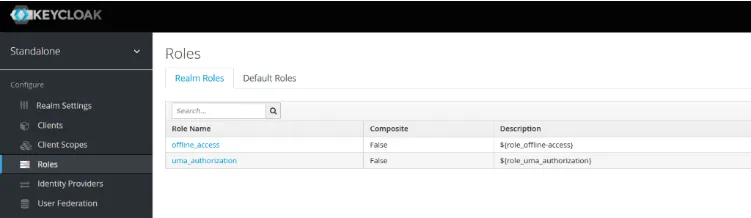
2. Verify that the following roles exist:
- offline_access
- uma_authorization
Authentication
To verify Authentication:
1. From the Navigation panel, click Authentication. The Authentication pane appears.
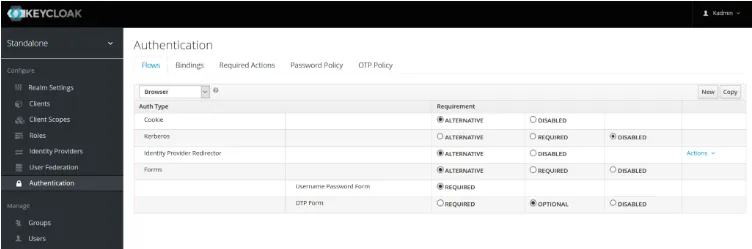
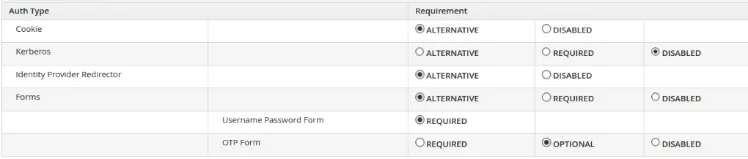
2. Verify the settings as shown:
Default Users
To verify the Default Users: 1. From the Navigation panel, click Users. The Users pane appears.
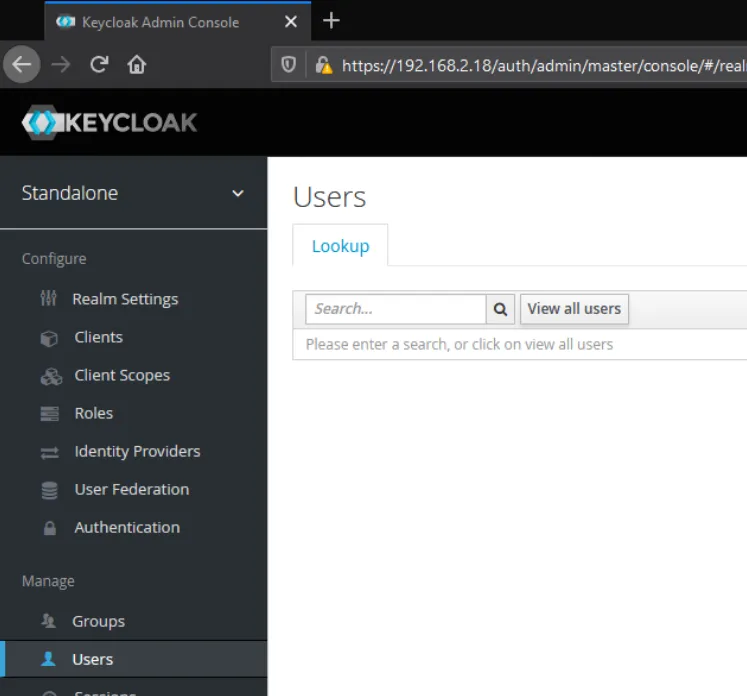
2. Click View all users and verify that the following users exist:
- demo
Admin Console Post-Installation Checklist
This checklist provides steps that should be performed to verify that the Belden Horizon Data Manager is configured as desired and works correctly.
You must do the following:
- Verify the current device time
- Verify available licenses
Before You Begin
- Make sure that you have installed and configured the Belden Horizon Data Manager application on the same network as your devices. See Virtual Machine Installation (ESXi), Virtual Machine Installation (ESXi-Hypervisor), or Virtual Machine Installation (VMWare Workstation Player) for more information.
- Log in to Belden Horizon Data Manager the first time after installation.
To verify the current device time:
1. Log in to Belden Horizon Data Manager Admin Console.
2. From the Navigation panel, select Dashboard. The Dashboard module appears.
3. From the CPU section, view the current device time.

Notes:
- The current device time displays the time of the virtual host.
- Initially, no Companies, Projects, or Devices are configured.
To verify available licenses: 1. From the Navigation panel, select Settings,. The Settings pane appears.
2. From the Settings pane, select Licenses.
3. From Licenses' Available Licenses section, view the license list. Initially, the device operates on a trial license.
Note: Make sure to activate site license server to provision site licenses to edge devices during activation provision.