Deployment Using an Azure Template
You can deploy Belden Horizon Data Manager from an Azure Template.
Important for Cloud Deployment:
Before activating the license, ensure all hardware / VM configuration steps that can modify the MAC address (add/replace a Network Interface Controller (NIC) card) are finalized.
The license Host ID depends on the Media Access Control (MAC) address for the device. The MAC address identifies the devices on a network. Changing the MAC address will invalidate the license.
Before You Begin
- From Azure, create an IoT Hub, and create a Microsoft Template.
- From Azure, create an SSH Public Key.
To manually deploy Belden Horizon Data Manager using Azure Template, you will need to do the following.
- Step 1: Create a Resource Group and Deploy the application
- Step 2: Initialize and Log in to Belden Horizon Data Manager Admin Console
- Step 3: Configure the SSL Settings
- Step 4: Log in to Belden Horizon Data Manager (LEM) UI
- Step 5: Verify Post-Installation Checklist
To jump to a specific section, refer to the Table of Contents on the right side and click the corresponding step.
Step 1: Create a Resource Group and Deploy the Application
On Azure, you will first need to create a resource group and deploy the application.
To create a resource group and deploy the application:
1. Open the Microsoft Azure home page, and then click Custom Deployment.
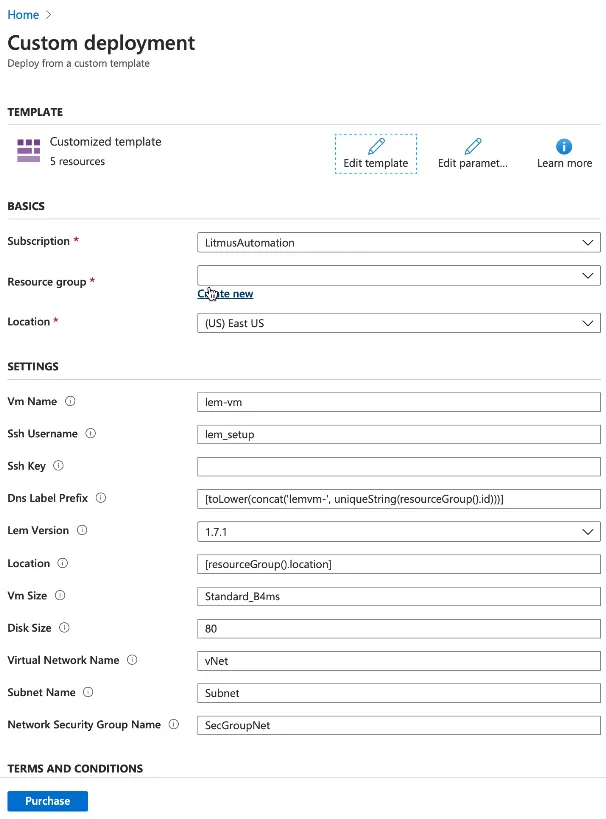
2. From the Custom Deployment dialog box, do the following:
a. Select your account from the Subscription drop-down list. b. Click Create New next to the Resource Group field. The Name dialog box appears. c. Enter a name for the resource group in the Name field, and then click OK. The resource name appears in the Resource Group field. d. Paste the SSH key in the Ssh Key field. e. Check the I agree to the terms and conditions stated above check box, and then click Purchase. The custom template validates and then deploys. The Azure Services pane appears, listing the new resource group. A deployment progress message appears.

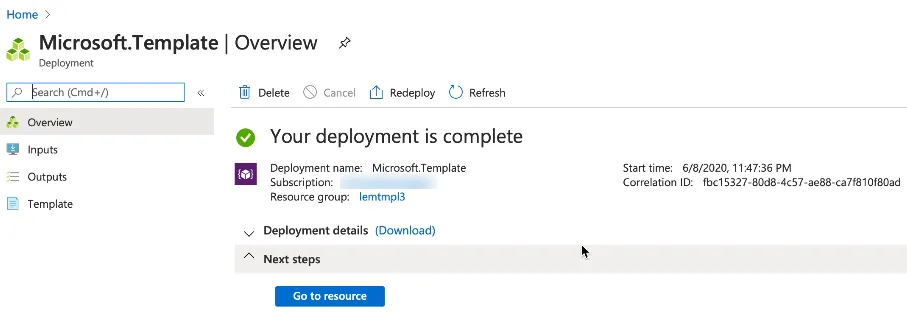
f. Click Deployment in progress. The Microsoft Template Overview pane appears.
Step 2: Initialize and Log In to Belden Horizon Data Manager Admin Console
After creating a resource group and deploying the application, you will need to initialize and then log in to the Belden Horizon Data Manager Admin Console.
To Initialize and then log in to Belden Horizon Data Manager Admin Console:
1. From the Microsoft Template Overview pane, click Outputs. The Microsoft Template Outputs pane appears. 2. Click the Copy icon next to the adminUI URL. The adminUI URL is copied to your clipboard. 3. Open a new browser tab and paste the adminUI URL. For example, https://emvm-rctnycfbulz3g.eastus.cloudapp.azure.com:8446. The Not Secure Warning dialog box appears. 4. Follow the browser guidelines for how to bypass a self-signed security error message. See Browser Access Restrictions for more information. The Belden Horizon Data Manager Admin Console application initializes and the Log In window appears. 5. Log in to the Belden Horizon Data Manager Admin Console application, and then change your password. See Access to Belden Horizon Data Manager for more information. The Belden Horizon Data Manager Admin Console application appears.
Step 3: Configure the SSL Settings
After logging in to Belden Horizon Data Manager Admin Console, configure the SSL settings.
To configure the SSL settings:
1. From Navigation panel in the Admin Console, select Settings. The Settings pane appears. 2. From the SSL Settings section, select Let's Encrypt Webroot mode, and then click Save. The SSL settings are saved.

3. Click Reload Page. The Settings pane reloads.
Step 4: Log in to Belden Horizon Data Manager UI
After configuring the SSL settings, you can then log in to Belden Horizon Data Manager using a browser.
To log in to LEM UI:
1. Return to the Azure Microsoft Template Outputs browser tab and click the Copy icon next to the emUI URL. The emUI URL is copied to your clipboard. 2. Open a new browser tab and paste the emUI URL. For example, https://emvm-rctnycfbulz3g.eastus.cloudapp.azure.com. The Belden Horizon Data Manager Log in window appears. 3. Log in to the Belden Horizon Data Manager application, and then change your password. See Access to Belden Horizon Data Manager for more information. The Belden Horizon Data Manager application appears.
Step 5: Verify Post-Installation Checklist
Verify the contents within the Post-Installation Checklist.